How to flush DNS cache (ipconfig) in windows?
DNS cache helps to load websites and web services faster without needing to communicate everytime to find where the website files are located. It saves time and delivers better performance each time.
But sometimes, the website or web service that you're accessing may change servers to another location, start using another ip, or update their DNS service provider. Most of the times, this happens automatically without requiring any effort from you.
In rare cases, you may need to manually flush the dns information and fetch new data. So the website will keep working fine without any issues.
This will help the website/web service load from the new dns, next time you try to access it.
Please can follow the below steps to flush dns and fetch new information.
Step 1: Open Command Prompt
WinXP :
Click "Start", then click "Run" and type "cmd" (without the quotes) and press enter.
Vista, Windows 7, Windows 8 and Windows 10 :
- Click "Start", type "Command" (without the quotes) in the search field.
- Right click at the command prompt icon and click "Run as Administrator".
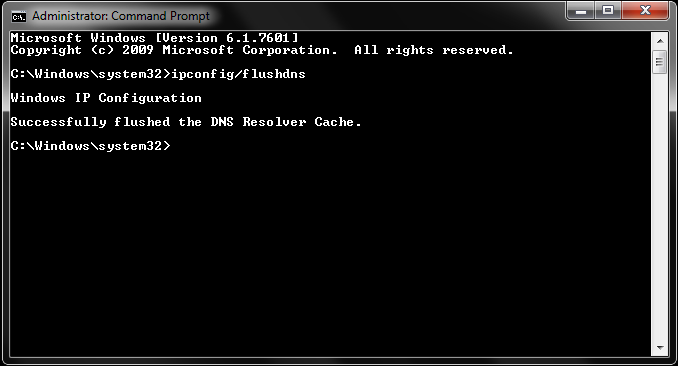
Step 2: Type command to flush
The above step will open the command prompt window. You should type "ipconfig /flushdns" (without the quotes) and press enter.
This will flush the dns cache from your computer and the next time you try to access the website, it will fetch fresh information.
Popular Posts
- How to clear your browser cache? (Hard Refresh)
- How to flush DNS cache (ipconfig) in windows?
- is Bitpetite (bitpetite.com) down right now? is it another digital scam?
- How to fix the Facebook down issue right now? #facebookdown
- Skype is down around the world - People struggle to video call/share screens.
- Time Warner's Spectrum Outage issue affects thousands of users across USA
- Live: Massive Power Outage (6.5million) & Flood Warning for Florida
- Duke Energy restores power to 160,000 & expects to restore others before Friday night.
- Google Analytics is down for users around the world.
- How to fix AT&T call issue? Try this easy method that works for many customers.